Injection Molding Glossary: Key Terms Every Electronics Manufacturer Should Know
If you’re designing enclosures, connectors, or components for electronics, injection molding isn’t just a process—it’s your bread and butter. And understanding its language?
2/23/20258 min read


Imagine this: You’re sitting in a design review, sipping lukewarm coffee, while your team debates why the latest gadget housing keeps cracking under stress. Someone throws out “draft angle,” another mumbles “clamping force,” and suddenly you’re wondering if you missed a memo. If you’re designing enclosures, connectors, or components for electronics, injection molding isn’t just a process—it’s your bread and butter. And understanding its language? That’s the difference between a flawless product launch and a costly redo.
This isn’t just another dry glossary. It’s your cheat sheet—crafted for designers and decision-makers in electronics development—to master injection molding terms that matter. Whether you’re sketching the next big wearable or deciding tolerances for a circuit housing, these definitions will help you talk the talk with mold makers, avoid rookie mistakes, and keep production humming. Let’s dive in.
Why Injection Molding Terminology Matters in Electronics
In the fast-paced world of electronics, where deadlines are tight and margins are tighter, miscommunication can tank a project. Picture this: You design a sleek phone case, but the mold maker misinterprets your “gate” placement. The result? An ugly mark right where the logo should shine. Or maybe you overlook “shrinkage,” and your precision-fit battery compartment ends up a hair too small. Knowing the lingo isn’t about sounding smart—it’s about saving time, money, and headaches.
For designers, these terms bridge the gap between your CAD file and the factory floor. For decision-makers, they’re the key to asking the right questions: Will this mold scale for 10,000 units? Can we tweak the “runner” to cut waste? This glossary isn’t just definitions—it’s your toolkit for collaboration and control. Ready to get fluent? Let’s break down the must-know terms.
The Injection Molding Glossary: Terms You’ll Wish You Knew Sooner
Here’s the meat of it: a rundown of key injection molding terms, tailored for electronics pros. I’ve kept it alphabetical so you can jump to what you need, and I’ve thrown in examples that hit home—like molding a USB-C port or a smartwatch bezel. Let’s go.
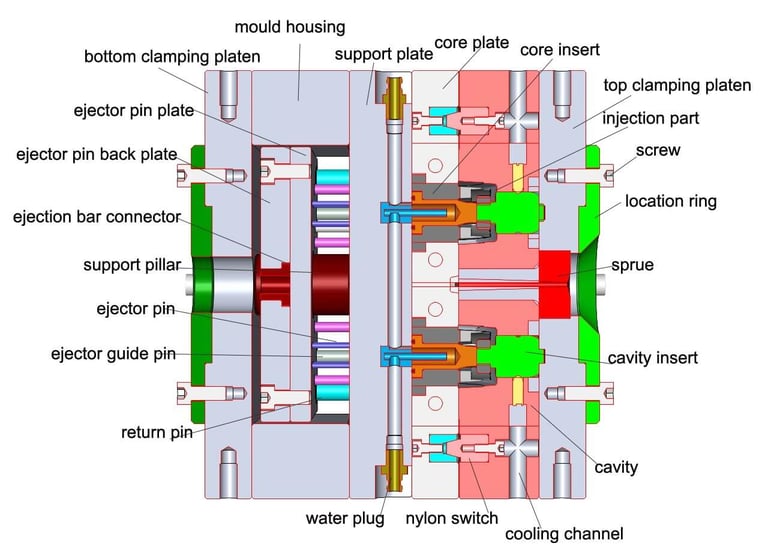
Cavity
The hollow space in the mold where molten plastic forms your part. In electronics, think of it as the birthplace of your component. A single-cavity mold might churn out one intricate connector at a time, while a multi-cavity setup could spit out four identical button housings per cycle. More cavities mean faster production—crucial when you’re racing to ship 50,000 units by Q4.
Clamping Force
The muscle that keeps the mold shut while plastic gets injected. Measured in tons, it’s a big deal for electronics parts with thin walls—like a laptop chassis. Too little force, and you’ll get “flash” (more on that later) creeping into your seams. I once saw a team underestimate this for a tablet casing; the result was a mess of excess plastic and a delayed launch. Check your material and part size—your mold maker will thank you.
Cycle Time
How long it takes to make one part, from injection to ejection. For a tiny headphone jack, it might be 20 seconds; for a chunky power adapter, maybe 45. Faster cycles mean more parts per hour, which matters when you’re scaling up. Pro tip: Thin walls and smart cooling can shave seconds off—time that adds up in mass production.
Draft Angle
The slight taper on a mold wall that lets the part pop out without sticking. Ever wonder why your phone’s side buttons have that subtle slant? That’s draft angle at work—typically 1-2° for plastics like ABS or polycarbonate. Skip it, and your molded part might cling like a kid refusing to leave the playground. I’ve seen designers fight this one, only to cave when ejection pins started scarring their prototypes.
Ejector Pins
The unsung heroes—metal rods that nudge the cooled part out of the mold. In electronics, placement is everything. Put them in the wrong spot on a delicate sensor housing, and you’ll dent the finish. A buddy of mine once had to redesign a mold because the pins left marks on a visible edge. Map these out early with your team.
Flash
That annoying extra plastic that oozes out where the mold halves meet. It’s the bane of clean electronics designs—like a jagged edge on a smartwatch frame. Too little clamping force or a worn-out mold usually causes it. I’ve seen it ruin batches of connector shells; a quick fix is tightening tolerances or upping the force.
Gate
The doorway where molten plastic enters the cavity. In electronics, gate type matters for aesthetics and strength. A “pinpoint gate” leaves a tiny dot (perfect for a hidden spot on a charger), while a “fan gate” spreads plastic evenly for flat panels. Mess this up, and you might get weak spots or visible blemishes—dealbreakers for premium devices.
Parting Line
The seam where the mold splits in two. On a molded keyboard case, it’s that faint line you can feel along the edge. Designers can hide it in crevices, but it’s still a telltale sign of molding. Plan it strategically—nobody wants a parting line slicing through their logo.
Runner
The highway that channels plastic from the injection unit to the cavities. In a “hot runner” system, it stays molten, cutting waste—a win for pricey resins like PEEK used in medical devices. “Cold runners” are cheaper but leave scraps you’ll need to recycle. For high-volume electronics, runners can make or break your material budget.
Shrinkage
The inevitable shrinking of plastic as it cools. Different materials shrink differently—ABS might drop 0.4-0.7%, while nylon could hit 1-2%. For a tight-fitting circuit board cover, misjudging shrinkage means parts won’t snap together. I’ve watched teams scramble to adjust molds mid-project over this—measure twice, mold once.
Sprue
The main feed line where plastic enters the mold from the machine’s nozzle. It’s like the trunk of a tree, branching into runners and gates. In electronics, it’s usually trimmed off post-molding, leaving a small nub. Ever notice that little bump on a cheap plastic toy? That’s the sprue mark—avoid it on visible surfaces.
Tooling
The art of designing and building the mold itself. For an electronics designer, this is where the rubber meets the road. A simple mold for a cable clip might cost a few grand, but a complex, multi-cavity mold for a headset? Think five figures. Tooling decisions—steel vs. aluminum, single vs. multi-cavity—shape your timeline and budget.
Venting
Tiny escape hatches in the mold that let air out as plastic rushes in. Without them, you get trapped air bubbles—ugly burn marks or voids in your part. I once saw a prototype run of LED housings ruined by poor venting; the fix was a few strategically placed 0.01-inch gaps. Small detail, big impact.
Core
The part of the mold that shapes the inside of your piece—like the hollow center of a battery compartment. Paired with the cavity, it’s how you get those precise internal features electronics need. A slick core design can cut weight without sacrificing durability.
Wall Thickness
How thick your part’s walls are—critical for strength and moldability. In electronics, thin walls (1-2 mm) are king for lightweight gadgets like phone cases or earbud shells, but go too thin, and you risk weak spots or “sink marks” (those annoying little dips where plastic cools unevenly). Too thick, and you’re burning extra material and time—plus, cooling gets tricky. I once worked on a tablet housing where uneven walls led to warping; we had to redesign at 1.5 mm uniform thickness to nail it. Balance is everything—consult your material spec sheet and test early.
Warpage
When your part twists or bends out of shape after cooling—usually from uneven wall thickness or poor cooling design. Think of a warped circuit board cover that won’t sit flat; it’s a nightmare for assembly. I’ve seen this sink a batch of monitor stands—turns out the thick base cooled slower than the thin sides. Keep walls consistent and tweak your “cycle time” to dodge this bullet.
Weld Line
The spot where two flows of molten plastic meet in the mold and fuse—sometimes leaving a faint seam. On a molded USB hub, it might show up where plastic wraps around a core. It’s not just cosmetic; weld lines can be weak spots if the plastic doesn’t bond fully. A colleague once had to scrap a run of connectors because weld lines cracked under stress—better venting and gate placement saved the next round.
Boss
A raised stud or post—think of those screw mounts inside a remote control. Bosses beef up assembly strength, but they’re sink mark magnets if the walls are too thick at the base. I’ve learned the hard way: keep the boss walls thin (about 60% of the main wall thickness) and add ribs for support. It’s a small tweak that keeps your parts looking clean and functional.
Rib
A thin, supportive strip that adds strength without bulking up the whole part—perfect for electronics enclosures. Picture the underside of a keyboard: ribs keep it rigid without adding weight. Overdo the height or thickness, though, and you’re begging for sink marks on the flip side. A good rule? Ribs should be 50-60% of the wall thickness—I’ve stuck to that since a flimsy prototype taught me otherwise.
Sink Mark
A shallow depression where thick sections cool unevenly. Ever seen a dimple on a plastic case near a screw boss? That’s your culprit. It’s the kind of flaw that QA flags in a heartbeat—or worse, customers notice. Keep wall thickness consistent, and avoid chunky features next to thin ones. I’ve dodged these by slimming down bosses on a smartwatch backplate—lesson learned.
Tolerance
How much wiggle room your dimensions can handle—like ensuring a battery slot fits just right. In electronics, tight tolerances (say, ±0.05 mm) are non-negotiable for snap-fits or connectors. Looser ones might work for a decorative bezel. Push tolerances too tight, and your mold costs skyrocket—I’ve seen teams wrestle with this trade-off mid-project. Know your priorities up front.
Undercut
A feature that locks into the mold, like a snap-fit tab on a remote casing. It’s genius for assembly—snap that cover on, no screws needed—but a pain for ejection. You might need side-action molds (read: extra cost and complexity) to pull it off. I’ve seen designers debate undercuts for hours, only to simplify when the budget reality hit. Plan these early with your mold maker.
How to Use This Glossary in Practice
So, you’ve got the terms—now what? Let’s say you’re designing a wearable fitness tracker. You sketch a sleek shell with a snap-fit cover. Armed with this glossary, you’ll know to spec a “draft angle” for easy release, check “shrinkage” for a snug fit, and position the “gate” where it won’t mar the finish. When your mold maker asks about “clamping force,” you won’t blink—you’ll know it’s tied to avoiding “flash” on those thin walls.
For decision-makers, this is your ammo in the war room. Need to cut costs? Push for a “hot runner” system to save material. Worried about defects? Ask about “venting” and “cycle time.” Keep this page handy—I’ve got mine bookmarked for every new project kickoff. It’s like having a translator for the factory floor.
Additional Resources for Electronics Pros
Want to dig deeper? Check out our post on “Top 5 Injection Molding Defects in Electronics—and How to Fix Them” for troubleshooting tips. The Plastics Industry Association (plasticsindustry.org) has great whitepapers too. Got a term you think we missed? Drop it in the comments—I’m always tweaking this list based on what you folks run into out there.
Wrapping It Up
Injection molding isn’t just a process—it’s a language, and now you’re fluent. From “cavity” to “undercut,” these terms are your ticket to designing smarter electronics and making sharper calls. Share this with your team, bookmark it for your next sprint, and watch how it smooths out the wrinkles in your workflow. You’ve got this—and so does your next molded masterpiece.
SERVICES
Peakingtech © 2025. · Shenzhen, China · Privacy Policy · Terms of Service
Contact Form
Metal Parts
Peakingtech® is a registered trademark of Peakingtech Co in the United States.
COMPANY
CONTACT