How to Customize Off-the-Shelf Enclosures for Your Electronics Project
Off-the-shelf enclosures are the unsung heroes of the electronics world—pre-made, cost-effective, and surprisingly adaptable. With a bit of creativity and the right tools, you can transform these generic boxes into tailored homes for your gadgets.
2/5/20254 min read


Imagine this: You’ve spent weeks perfecting your latest electronics project—a sleek IoT sensor for monitoring air quality. The circuitry works flawlessly, but there’s one problem: you can’t find a case that fits your unique design. Store-bought enclosures are either too bulky, lack mounting points, or look like they belong in a 1990s garage sale. Sound familiar?
This is where off-the-shelf enclosures shine. They’re the unsung heroes of the electronics world—pre-made, cost-effective, and surprisingly adaptable. With a bit of creativity and the right tools, you can transform these generic boxes into tailored homes for your gadgets. In this guide, we’ll walk you through the art (and science) of customizing enclosures to meet your project’s needs, whether you’re a DIY enthusiast or a startup founder prepping for mass production.
1. Why Choose Off-the-Shelf Enclosures?
Let’s face it: building a custom enclosure from scratch is like reinventing the wheel. It’s expensive, time-consuming, and often unnecessary. Off-the-shelf enclosures offer a smarter starting point. Here’s why:
Cost Efficiency: Custom molds and manufacturing setups can cost thousands. A standard enclosure? Think 10–10–50, even for robust metal or polycarbonate designs.
Time Savings: Skip the 8-week lead time for custom parts. Most off-the-shelf enclosures ship in days.
Variety: From tiny plastic junction boxes to rugged aluminum cases, there’s a shape and material for every need.
Customization Potential: These enclosures are like blank canvases. Drill a hole here, add a logo there, and voilà—it’s uniquely yours.
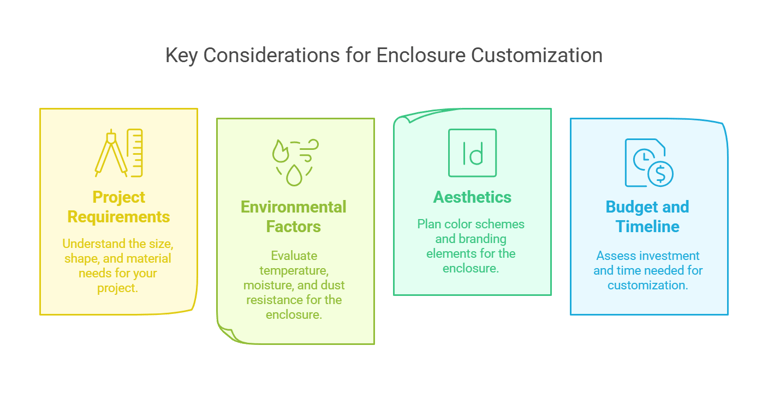
2. Key Considerations Before Customizing
Before you grab a drill or fire up a CNC machine, pause. A little planning now saves headaches later.
A. Understand Your Project’s Needs
Size Matters: Will your PCB, battery, and cooling fan all fit? Map components on paper first.
Functionality: Do you need ports for USB, HDMI, or antennas? What about ventilation slots to prevent overheating?
B. Environmental Factors
Will your device live indoors or battle the elements? A garden soil sensor needs waterproofing (look for IP67+ ratings), while a desk gadget might just need dust resistance.
C. Aesthetics and Branding
Your enclosure is your product’s “face.” A matte black finish with laser-etched logos screams premium; neon green might appeal to gamers.
D. Budget and Timeline
DIY cuts costs but eats time. Professional services cost more but deliver polish. Choose based on your priorities.


3. Common Customization Options
Here’s where the fun begins. Let’s explore ways to make that generic box yours.
A. Mechanical Modifications
Cutting Holes: Use a step drill bit for clean ports. Pro tip: Cover the area with painter’s tape to prevent slippage.
Mounting Points: 3D-printed brackets can secure internal components without permanent adhesives.
B. Surface Finishes
Metal Enclosures: Anodizing adds color and corrosion resistance. Powder coating offers a thicker, more durable layer.
Plastic Enclosures: Spray paint works for small projects, but UV-resistant coatings last longer outdoors.
C. Branding
Laser engraving adds a professional touch. For prototypes, vinyl decals are cheap and removable.
D. Functional Upgrades
Waterproofing: Silicone gaskets and rubber seals turn a basic box into a weatherproof fortress.
Thermal Management: Add mesh vents or attach a heat sink to keep components cool.
4. Tools and Techniques
DIY Approach
Hand Tools: A rotary tool (like a Dremel) can cut slots and polish edges. For straight cuts, a hacksaw + file combo works.
Templates: Print a 1:1 scale layout and tape it to the enclosure as a drilling guide.
Professional Help
Companies like Peakingtech offer services that take your project from “meh” to “wow”:
CNC Machining: Perfect for complex cuts or threaded holes.
Laser Engraving: Crisp logos, even on curved surfaces.
Powder Coating: Durable finishes in custom Pantone colors.
5. Step-by-Step Customization Guide
Pick the Right Base: Start with an enclosure slightly larger than your components. Aluminum is great for heat dissipation; ABS plastic is lightweight and cheap.
Design in CAD: Use free tools like Fusion 360 to model hole placements. Label each cutout (e.g., “12V power input”).
Prototype: Order one enclosure to test. Discovered the USB port is 2mm off? Adjust the design now.
Modify: If DIY, clamp the enclosure to a workbench to avoid slips. For manufacturers, share CAD files and material specs.
Assemble: Secure components with screws instead of glue—it’s easier to fix mistakes.
Finishing Touches: Wipe down surfaces with isopropyl alcohol before applying decals to ensure adhesion.
6. Why Work with Professionals?
While DIY is satisfying, professional services make sense when:
Precision is Critical (e.g., medical devices).
Scaling Up: A manufacturer can modify 100 enclosures faster than you can say “burnout.”
Advanced Needs: Want a two-tone finish or custom embossing? Pros have the gear.
7. Real-World Examples
IoT Smart Hub: A startup's Home Hub box Hoobs Pro used a plastic enclosure with aluminum bottom as passive heatsink.
Industrial Vibration Sensor: A factory needed waterproof housing. They chose a die-cast aluminum case, added IP68 gaskets, and mounted it with stainless steel brackets.
Portable ECG Monitor: A med-tech firm modified a slim aluminum enclosure with EM shielding and a antimicrobial coating for hospital use.
8. Pro Tips for Success
Measure Twice, Cut Once: A misplaced hole can ruin an enclosure. Use digital calipers for accuracy.
Test Extensively: Leave your prototype in a freezer overnight. Does the screen still work?
Communicate Clearly with Manufacturers: Provide drawings, not just verbal descriptions.
Conclusion
Customizing off-the-shelf enclosures is like giving a tailored suit to your electronics project—it fits perfectly without the bespoke price tag. Whether you’re tweaking a case in your garage or partnering with a pro, the key is to start with a solid plan and iterate fearlessly.
