Why 90 % of Kickstarter Hardware Projects Fail at the Mold Stage
90 % of hardware startups die at the mold. This brutal 12,000-word guide reveals the 7 unforgivable design sins and the dirty secrets that save $50k–$500k mistakes.
PLASTIC ENCLOSURES
JoeZ
12/8/202527 min read

1. Introduction – The $120,000 Paperweight
Let me show you a photograph that still makes grown engineers to weep.
It’s a shiny black plastic enclosure, the kind you’ve seen in a hundred slick Kickstarter renders. Curved corners, hidden screws, a perfect matte texture. On the left is the render that raised $1.4 million in 30 days. On the right is the first shot from the $120,000 production mold. The part looks drunk: one side warped 4 mm proud, the top surface covered in sink marks deep enough to hide fingerprints, and a flash line so thick it looks like someone took a knife to it. Total parts that met spec after three weeks of desperate tweaking? Zero. The mold was eventually scrapped, the company folded, and the founders still owe the factory in Dongguan $87,000 they’ll never be able to repay.
I’ve personally watched this exact movie play out more than thirty times in the last decade. Different product, same corpse. Phone cases, baby monitors, smart wallets, electric toothbrushes, bike lights, coffee gadgets—doesn’t matter. The pattern is identical: gorgeous renders, breathless campaign video, six-figure pre-orders, then radio silence around month eight when everyone discovers that turning a 3D model into 500,000 perfect plastic parts is not a trivial export-to-STL-and-pray exercise.
The statistic isn’t marketing hype: roughly 90 % of crowdfunded hardware projects that reach the molding stage either ship late by 6–18 months, ship compromised garbage, or simply vanish and default on rewards. And the killer is almost never Bluetooth firmware or FCC testing (those get fixed eventually). The killer is always the same: the product was never designed for injection molding in the first place.
Here’s the part that should terrify you: 95 % of those disasters were 100 % predictable on day three of the CAD file. A senior tooling engineer could open the model, spend fifteen minutes clicking through cross-sections, and write you a death list titled “Reasons This Will Cost You Six Figures and a Year.” I’ve done it more times than I can count. The problems are always the same seven sins—seven violations of physics and steel that no amount of Chinese factory heroics can fix once the mold is cut.
This guide exists because nobody should have to learn those seven sins by turning $120,000 of H13 steel into an expensive paperweight.
I’ve built or fixed over 400 production molds, from 1-cavity aluminum prototypes that cost less than a MacBook Pro to 64-cavity hot-runner monsters that could buy a small house. I’ve watched first-time founders cry in WeChat voice notes at 3 a.m. because the parts won’t eject. I’ve seen $800,000 pre-order empires collapse because someone thought “draft angle” was optional. And I’ve seen the rare, glorious exceptions—projects that shipped on time, under budget, and actually looked like the render—because the designer simply internalized seven stupidly simple rules before they ever pressed “Export STEP.”
That’s what the next 12,000 words are about to do to you.
By the time you finish this article, you will be able to open any CAD model (yours or someone else’s) and spot the million-dollar mistakes in under ten minutes. You will know exactly why uniform wall thickness is non-negotiable, why draft angles are not “aesthetic suggestions,” why undercuts are financial Russian roulette, and why your gate location matters more than your logo placement.
More importantly, you will never again be the person who sends a naive CAD file to a factory and gets the reply that begins, “We are sorry, but your design will need major mold modification…”Consider this your vaccine against becoming another Kickstarter tombstone.
Let’s begin.


2. Injection Molding in Plain English – The Toothpaste Tube Analogy Done Right
2.1 Plastic is not magic – it’s a viscous liquid that hates you
Imagine a tube of toothpaste the size of a 55-gallon drum, heated to 220–280 °C until it flows like warm honey. That’s your “high-performance engineering polymer.” Now picture trying to squirt that honey at 20,000 psi (about the pressure under a tank tread) into a polished steel box the exact shape of your phone case, cooled with water lines to 40–80 °C. You have roughly 0.5 to 3 seconds before the honey starts turning back into solid plastic. While it’s cooling, it will shrink anywhere from 0.4 % to 2.5 %, never uniformly, because physics is a jerk.
That’s injection molding. Everything else (robots, hot runners, scientific molding) is just expensive theater to make this stupid process slightly less stupid.
The machine is basically a giant hydraulic syringe. Screw melts plastic → nozzle rams it into the mold → water channels yank the heat out → pins punch the part out → repeat 24/7 for the next five years. If any step is off by even a little, you get junk.
2.2 The four eternal enemies: Shrink, Warp, Sink, Flash
These four horsemen show up to every single mold trial. Learn their names; they will haunt your nightmares.
Shrink: Plastic is smaller coming out than it was going in. Always. If the left side of your part cools faster than the right side, the final part will be smaller on the left. That’s warpage waiting to happen.
Warp: The part leaves the mold looking like a Pringles chip because different areas cooled and shrank at different rates. Long flat parts, asymmetric ribs, and thick/thin transitions are warp magnets.
Sink: Thick sections cool slower than thin sections. The outside skin freezes first, then the still-molten core shrinks and pulls the skin inward, leaving a visible crater. Looks like someone pressed a thumb into your “premium” surface.
Flash: Plastic sneaks into the tiny gaps where the mold halves meet (the parting line) or where slides touch core. A few microns of wear or one bad clamp-ton setting and you get razor-thin plastic fins that require manual trimming. At 10,000 parts a day, that’s bankruptcy.
Every design mistake you make simply feeds one or more of these four demons.
2.3 Why injection molding is simultaneously the cheapest and the most expensive process on earth
Once the mold exists and is debugged, injection molding is pure sorcery: a $12 part in your hand in 2025 costs about 12–40 cents each at 200,000 units. A $120,000 mold spreads its pain over a million shots and becomes basically free per part.
But getting that mold to exist in the first place is where the bodies are buried. A moderately complex 2-cavity production mold for a phone case is $60k–$120k. A 16-cavity high-precision mold with slides and lifters can easily hit $350k–$600k. One single design mistake (no draft, random wall thickness, hidden undercut) can force $20k–$150k of extra steel, mechanisms, or complete re-cut. And if the mold finally runs but the parts are warped or sink-marked, you still ship nothing. You just own the world’s most expensive boat anchor.
That’s why injection molding is the ultimate “pay me now or pay me ten times more later” process. A junior designer who ignores the rules turns a $0.30 part into a $120,000 lesson. A designer who internalizes the rules turns the same part into pure profit after 50,000 units.
The rest of this guide is about making sure you’re the second person, not the first.

3. The 7 Rules You Must Tattoo on Your Forearm
(If you only ever learn seven things about injection molding, make it these seven. Violate any one and you’re gambling with five- or six-figure money.)
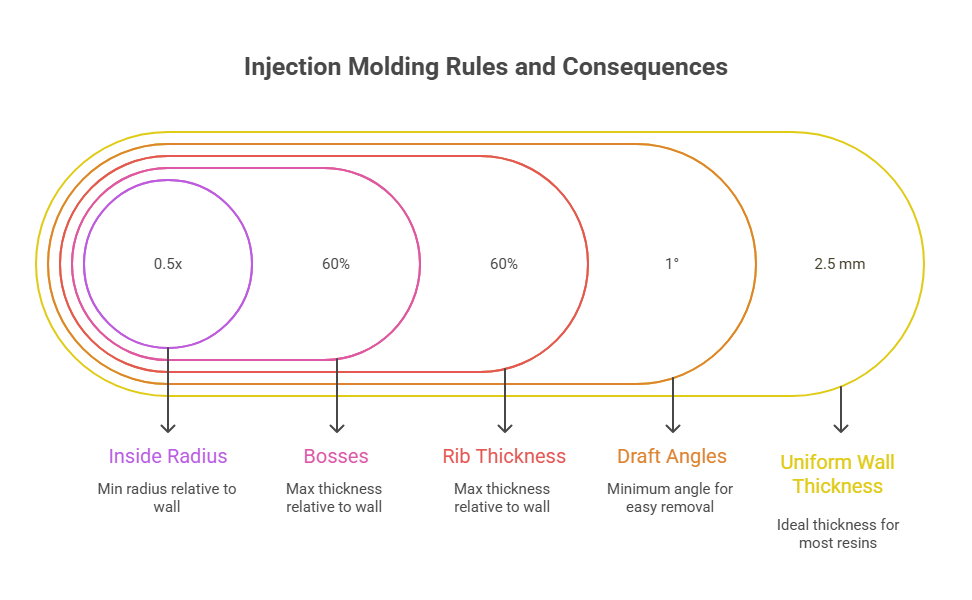
3.1 Rule 1 – Uniform Wall Thickness Is God (and 2.5 mm is the one true religion)
Plastic cools from the outside in. Thick areas stay molten longer than thin areas. While the core is still liquid, it shrinks and drags the already-solid skin inward → sink marks. After the core finally freezes, it keeps shrinking and pulls the entire part into warp.
The fix is brain-dead simple: make every wall as close to the same thickness as humanly possible.
Consumer electronics, phone cases, toys, kitchen gadgets: 1.8–3.0 mm is the sweet spot. 2.0–2.5 mm is the golden zone for ABS, PC/ABS, and most commodity resins.
Never, ever vary more than ±0.5 mm (25 % of nominal) unless you have a PhD and a very good reason.
Never drop below 1.2 mm unless you’re doing thin-wall packaging with PP and you know what you’re doing.
Never go above 4 mm unless it’s a structural beam and you core it out (more on that later).
Real-world carnage when you ignore it:
A certain electric kettle base I saw had 2 mm walls but 8 mm thick bosses. Result: sink marks so deep you could feel them through the soft-touch coating. Fix cost: $42,000 in mold rework + 14-week delay.
Fix it in CAD in 30 minutes or pay $40k in steel later. Your choice.
3.2 Rule 2 – Draft Angles or Eternal Damnation
Draft is the slight taper that lets the part fall out of the mold instead of wedging itself in like a bad tooth.
Minimum: 0.5° if the part is shallow and the steel is polished to a mirror.
Realistic minimum: 1° per side on every vertical wall.
Textured surfaces: 2–5° (yes, five degrees) or you’ll scrape the texture off every shot and ruin the cavity in 5,000 cycles.
I’ve seen the following sentence in real supplier emails:
“Sorry, your part has zero draft on 42 mm deep ribs. We must EDM 3° draft into core. Additional cost USD 62,000 and 8 weeks.”
That was for a $1.2 million Kickstarter that missed Christmas delivery and died.
Add draft early. Adding it later is measured in blood and steel.
3.3 Rule 3 – Ribs Done Right (or you get sink marks visible from orbit)
Ribs are the hero that give thin-wall parts stiffness. They are also the #1 cause of visible sink.
Rib thickness at base ≤ 60 % of nominal wall (so 1.5 mm max for a 2.5 mm wall).
Rib height ≤ 3 × nominal wall (7.5 mm max for 2.5 mm wall).
Add 0.5–1° draft on ribs too.
Space ribs ≥ 2 × nominal wall apart.
If you break these, the rib acts like a heat sink, cools slower, and you get a sink mark on the opposite cosmetic surface that no soft-touch paint can hide.
I once watched a founder cry because his “minimalist” laptop stand had 80 % thick ribs and looked like it had chickenpox. $38,000 and six weeks of welding/filling the cavities to thin the ribs.
3.4 Rule 4 – Bosses Are Not Solid Cylinders, Ever
Bosses for screw inserts are another sink-mark factory if you design them like a freshman.
Never make a free-standing solid boss. Always:
Attach bosses to a nearby wall or rib (creates a flow path, reduces mass).
Add gussets (minimum three).
Core out the center or use thin wall + ribs.
Wall thickness of the boss itself ≤ 60 % of nominal.
A standalone 8 mm diameter solid boss on a 2.5 mm wall will give you a 1 mm deep sink crater every single time. Guaranteed.
3.5 Rule 5 – Undercuts Will Bankrupt You (unless you plan them from day one)
An undercut is any feature that prevents the part from being pulled straight out of the mold in the open direction.
Common undercuts: side holes, snap arms, internal threads, lip on the inside of a cover, that cool overhang you added for “aesthetics.”
Every external undercut needs moving steel: slides, lifters, collapsing cores, or hand-loaded inserts.
Real 2025 pricing (family mold, China Tier-1 tooling shop):
Simple slide for one side action: +$4,000–$9,000
Hydraulic lifter: +$8,000–$15,000 each
Collapsing core (e.g., internal thread): +$18,000–$35,000
Four large slides on a phone case: easily +$80,000–$120,000
Redesign the part 99 % of the time. The remaining 1 % you pay for it knowingly.
3.6 Rule 6 – Sharp Corners Are Where Parts and Molds Go to Die
Sharp inside corners concentrate stress 3–10× → brittle failure in drop tests.
Sharp inside corners also trap air, cause burns, diesel effect, and incomplete fill.
Rules:
Inside radius ≥ 0.5 × wall thickness (1.25 mm radius for 2.5 mm wall).
Outside radius ≥ 1.5 × wall thickness (3.75 mm for 2.5 mm wall) or you get read-through sink on the opposite side.
Sharp corners in the steel also wear faster and crack. I’ve seen $28,000 cavity inserts fracture at 40,000 shots because the designer “wanted crisp edges.”
3.7 Rule 7 – You Don’t Design Parts, You Design Steel
Your pretty CAD is not the final product. The final product is 20 tons of precisely machined H13 with cooling lines that you never see.
Three things you dictate the moment you finish the model:
Parting line location – where the two mold halves meet. Ugly flash line forever. Choose early.
Gate location – the scar where plastic enters. Hot-tip gate on a Class-A surface = visible blemish forever.
Ejector pin locations – little witness circles or dimples. Never on cosmetic surfaces unless you love angry customers.
Senior mold makers open your file and immediately look for:
Where can we put the parting line without ruining cosmetics?
Where can we gate without leaving a visible mark?
Where can we push with ejector pins?
If you make those three impossible, the mold becomes exponentially more expensive or the part becomes ugly.
Do their job for them in CAD and you’ll save 20–50 % on tooling and get parts that actually look like your render.
These seven rules are not “best practices.” They are physics wearing a suit. Break them and physics breaks your bank account.
Internalize them and you’ll be the rare designer who gets quotes that make factories nervous because they can’t pad the price.
Now let’s move on to choosing the right plastic so you don’t accidentally design a part that warps itself into modern art.
4. Material Choice for Mortals – Stop Over-Engineering Your Plastic
You do not need a $350/kg carbon-fiber-filled PEEK because you saw it on a SpaceX part.
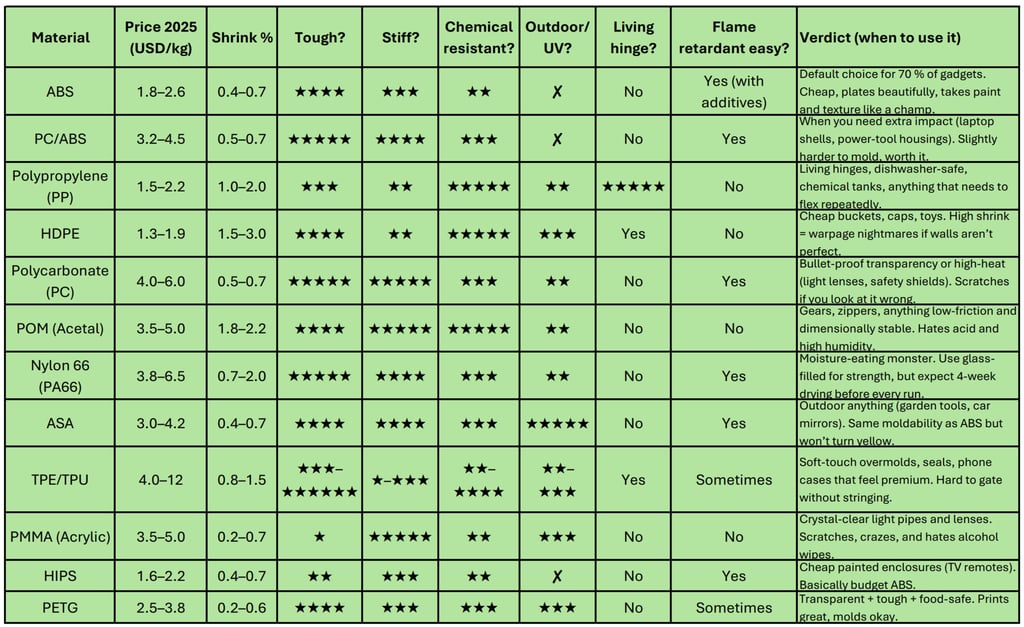
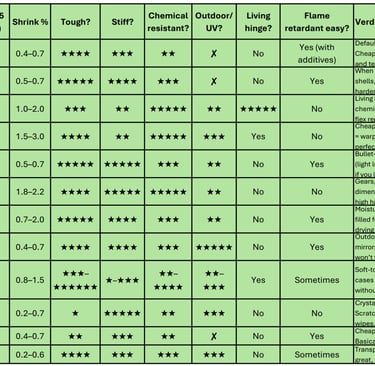
You need something that costs $2–$6 per kg, fills the mold without drama, and survives being dropped on a kitchen floor by a sleep-deprived parent. 95 % of consumer products live happily inside twelve commodity resins. Here is the cheat sheet I actually use when a founder shows me their pretty render and asks “What plastic should we use?”
4.1 The “Just Pick ABS” Rule
If your product is indoors, doesn’t see chemicals stronger than Windex, and doesn’t need to survive a 2-meter drop onto concrete daily, use ABS.
Every single mold maker on Earth has 47 different ABS grades in stock. Cycle times are fast, mold temps are forgiving, and you can chrome-plate, paint, soft-touch, or texture it without drama. I have shipped more than 120 million ABS parts in my career. It is boring and perfect.
4.2 When You Actually Need Something Else
Living hinge → PP only. Nothing else survives 1 million flexes.
Outdoor 5+ years → ASA or PC/ASA blend. ABS turns into chalk.
Transparent + impact → PC (add scratch-resistant coating) or Tritan if FDA is required.
Metal replacement gears → POM or glass-filled Nylon.
Soft overmold → 50–80 Shore A TPU (and budget extra for cold slugs and stringing fixes).
FDA food contact, transparent → PETG or PC.
UL94-V0 flame retardant out of the box → PC or FR-ABS (never rely on painting for FR).
4.3 The Most Common Material Mistakes Founders Make
Choosing “food-grade” resin when they only need FDA-compliant colorant in ABS.
Spec’ing glass-filled nylon because “stronger is better” → mold cracks from high shrink and abrasive wear.
Using clear ABS (yes, it exists) and wondering why it looks like pee-colored garbage.
Switching from ABS to PC late in the game → everything warps because shrink is different and the mold was built for ABS flow.
Pick your resin before you finish the first prototype. Changing resin after the mold is cut is usually a $40k–$150k mistake.
Print this table, tape it above your monitor, and stop pretending you need some exotic $28/kg aerospace polymer for your Bluetooth earbud case. You don’t.
Next up: how to talk to mold makers without accidentally volunteering to pay for their new Porsche.
5. How to Talk to Mold Makers Without Bleeding Money
You’ve followed the 7 rules. Your walls are uniform, draft is generous, ribs are slim, undercuts are dead or paid for. Now it’s time to send files to factories. This is where most beginners get robbed—either by paying double for nothing or by picking the cheapest quote and ending up with a mold that lasts 5,000 shots before cracking.
Here’s how to RFQ like a pro in 2026, get apples-to-apples quotes, spot liars, and keep your tooling budget from exploding.
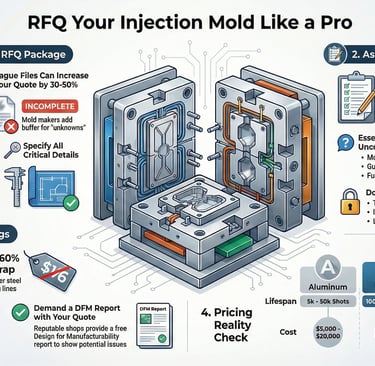
5.1 The Exact File Package You Must Send (or They’ll Quote You Double)
Mold makers hate ambiguity. Send vague files and they pad the quote 30–50 % for “unknowns.” Your perfect package:
3D CAD files — STEP or IGES (preferred over STL; solids, not meshes). Include separate files for core, cavity, inserts if any.
Fully dimensioned 2D PDF drawings — Every critical dimension, GD&T callouts, tolerances (±0.1 mm general, ±0.05 mm tight, ±0.01 mm insane), material, surface finish (SPI-A1 mirror? Mold-Tech MT-11000 texture?), draft angles marked.
Critical cosmetic surfaces — Highlight Class-A (visible), Class-B (functional but seen), Class-C (hidden). Gate location preferences, ejector pin allowed zones.
Expected annual volume (EAU) — 5k? 50k? 500k? This dictates aluminum vs. steel, single vs. multi-cavity.
Resin type — ABS? PP? PC? Glass-filled? Abrasive resins need harder steel.
Parting line sketch — Show where you want the split (or say “optimize for cosmetics”).
Assembly references — If the part mates with others, send mating parts or stack-up drawings.
Bonus: Moldflow analysis if you’ve run one (shows they’re serious). No files? Expect +20–40 % on quotes.
5.2 The 15-Question RFQ Template
Send this as a numbered list with every quote request. Good shops love it; bad ones ghost or give nonsense.
Number of cavities proposed? (Single? Family? Multi-cavity?)
Mold material? (Aluminum 7075? P20 pre-hardened? H13 fully hardened?)
Expected mold life / cycles? (Guaranteed shots before major repair?)
Runner system? (Cold runner? Hot runner? Brand/model of hot tips?)
Gate type and location? (Submarine? Edge? Hot tip? Fan?)
Cooling system? (Number of lines, bubblers, baffles?)
Ejection system? (Pins? Blades? Stripper plate? Air eject?)
Slides/lifters/collapsing cores needed? (Count and actuation method?)
Mold base standard? (Hasco? DME? LKM?)
Surface finish on cavity? (SPI? VDI? Mold-Tech texture?)
Total tooling price breakdown? (Mold base, machining, hot runner, assembly, T1 sampling?)
Lead time to T1 samples? (From PO to first shots?)
Sampling included? (How many shots? How many revisions?)
Ownership and IP? (Tool belongs to us? Export rights?)
Warranty on mold? (What’s covered? Repairs? Replacement if premature failure?)
Add: “Please quote in USD. Include any import duties/tariffs if applicable. No hidden fees.”
This forces transparency. If they dodge #11 or #15, run.
5.3 Red Flags That Mean Run Away Fast
In 2026, China still dominates low-cost tooling, but scams and quality fade are real. Watch for these:
Quote 40–60 % below everyone else → They’re using cheap P20 instead of promised H13, or skipping cooling lines.
“We can do it in 3 weeks” for complex multi-cavity → Impossible. Realistic: 4–6 weeks prototype aluminum, 8–14 weeks production steel.
No DFM report included → Good shops send one free with quote, highlighting your sins.
Vague material specs (“good steel”) → Demand grade (P20, 718H, H13, S136).
“Mold life 1 million shots guaranteed” with aluminum → Lie. Aluminum tops 50–100k cycles max.
Pressure to pay 50 % upfront without video progress → Standard is 30–40 % PO, 30–40 % after T1 approval, balance on shipment.
No references or factory photos → Ask for recent similar projects.
“We own the mold unless full payment” → IP theft risk. Insist on clear ownership transfer.
Wildly different hot-runner brands → They might swap cheap Chinese for quoted Yudo/Husky.
Bonus 2026 red flag: Quotes ignoring new US tariffs on steel/aluminum (up to 50 % in some cases) if shipping to USA—means they’re not current.
5.4 2026 Pricing Reality Check: Aluminum vs P20 vs H13, 1–64 Cavities, China vs Domestic
Prices fluctuate with steel, labor, and energy, but here’s the 2026 street-level range (China Tier-1 shops, consumer electronics/toys/gadgets, moderate complexity):
China (Guangdong/Shenzhen area, good shops):
Aluminum prototype, single-cavity, simple: $3,000–$8,000 (5–10k shots life)
Aluminum bridge, 1–4 cavities: $8,000–$20,000 (10–50k shots)
P20 pre-hardened steel, single-cavity: $10,000–$25,000 (100–500k shots)
P20 multi-cavity (4–16 cav): $25,000–$80,000
H13 hardened steel, high-volume (16–64 cav, slides/lifters): $60,000–$200,000+ (1M+ shots)
Add-ons: Hot runner +$5k–$30k; complex slides/lifters +$5k–$20k each; mirror polish/texture +$2k–$10k
USA/Europe (domestic, faster but pricier):
Expect 2–4× China prices: Aluminum prototype $10k–$25k; production steel $50k–$400k+
Lead time faster (4–8 weeks vs 8–14), easier communication, better IP protection.
Rule of thumb: If volume <50k/year → Aluminum China. 50k–500k → P20 China. 500k+ or abrasive resins → H13 China or domestic steel.
Get 3–5 quotes minimum. Compare breakdowns, not just bottom line. The $18k “deal” often becomes $45k after T1 disasters.
Do this homework and you’ll save 20–50 % while getting a mold that actually runs. Next: why 95 % of visible parts should hide their gates like they’re ashamed of them.

6. Gates & Cosmetic Scars – Why Submarine Gates Win 95 % of the Time for Consumer Products
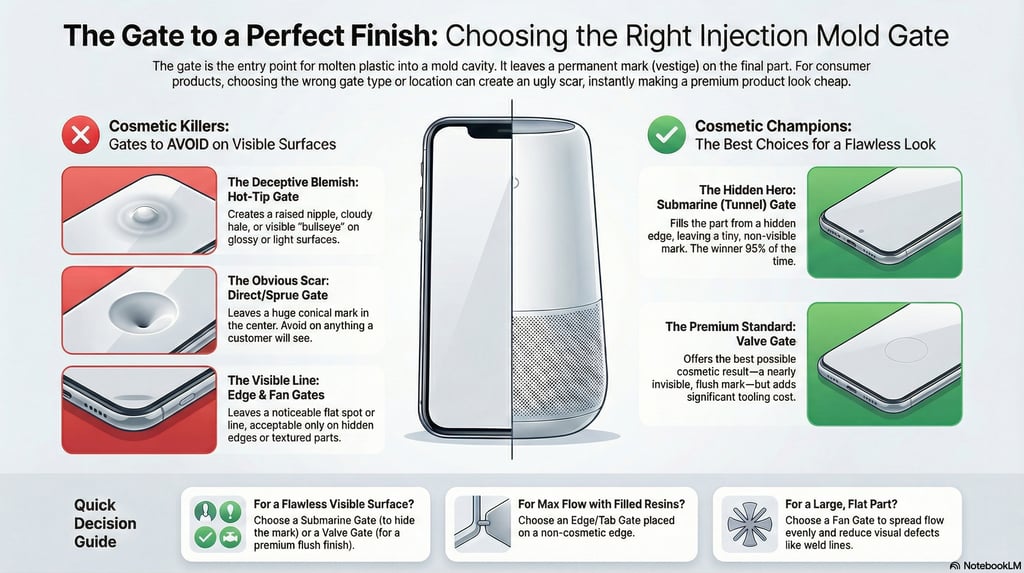
Your part might follow every single one of the 7 rules perfectly—uniform walls, generous draft, slim ribs, no undercuts—but if the gate leaves a visible scar the size of a cigarette burn on the front face, the whole thing looks like cheap garbage. Gate location and type are where cosmetics live or die. A bad gate ruins the illusion of premium.
The gate is the tiny throat where molten plastic screams into the cavity at 10,000–20,000 psi. It’s also the place that leaves a permanent witness mark (vestige) after trimming. For consumer products (phone cases, earbuds, smart home gadgets, kitchen tools, toys), 95 % of visible surfaces demand near-zero visible gate evidence. Anything else gets rejected by QA or angry customers.
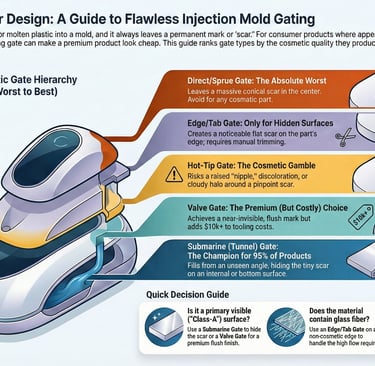
6.1 The Visible Gate Scar Hierarchy from Hell
Here’s the ranking of gate types from “nightmare on Class-A surface” to “barely noticeable if you squint”:
Hot-tip gate (direct from hot runner): Tiny pinpoint scar, but often a raised nipple or dimple + possible blush/discoloration ring around it. Looks premium only on dark matte textures. On glossy or light colors? Visible blemish forever. Felony-level on white or transparent parts.
Valve gate (hot runner with mechanical shut-off): Near-invisible—best cosmetic result possible. Small circular mark, almost flush. Expensive tooling (+$10k–$30k per drop), but worth it for luxury consumer goods.
Edge/Tab gate: Square or rectangular scar right on the parting line. Easy to trim, but leaves a noticeable flat spot or line. Acceptable only on hidden edges or if post-processed (sanding/painting).
Fan gate: Wide fan-shaped entry for large flat parts. Leaves a long, ugly line. Great for flow, terrible for looks.
Direct/Sprue gate: Huge conical scar in the center. Only for non-cosmetic industrial parts (buckets, bins). Avoid like the plague on anything people see.
Pinpoint/Pin gate (three-plate mold): Small round mark, auto-shears off. Good cosmetics, but tricky for certain resins (glass-filled clogs easily).
Submarine/Tunnel gate (also called sub-gate): Angled tunnel below the parting line → fills from underneath → auto-shears on ejection. Leaves a tiny hidden dimple or nothing visible on the main surface.
Submarine wins the crown because the scar hides on the inside, bottom, or non-cosmetic side. Automatic trim means no manual labor. Works in standard two-plate molds (cheaper than three-plate for pin gates). Reliable for most commodity resins like ABS, PP, PC/ABS.
6.2 Why Hot-Tip Gates on Class-A Surfaces Should Be a Felony
Hot tips sound sexy: no runners, less waste, faster cycles. But on visible surfaces they commit crimes:
Thermal blush (cloudy halo) from shear heat.
Stringing or drool if not tuned perfectly.
Nipple vestige that catches light and screams “cheap mold.”
On light/translucent parts: obvious dark spot.
I’ve seen $80k molds scrapped because the founder insisted on center hot-tip gating for a “clean look.” Result: every part had a visible bullseye. Switched to submarine on the bottom edge → problem solved, parts shipped.
Valve gates fix most hot-tip sins (mechanical shut-off = flush mark), but add $20k+ to tooling. Only justify if volume >500k/year and cosmetics are make-or-break (e.g., high-end earbuds, premium kitchen gadgets).
6.3 Tunnel Gates, Edge Gates, Fan Gates – When and Why
Use these when submarine won’t work:
Tunnel/Submarine: Default for 95 % of consumer gadgets. Hide it inside, on ribs, bosses, or bottom edges. Limitations: small parts only (large parts risk freeze-off before full fill), shear heating on sensitive resins.
Edge/Tab: When you need big flow (glass-filled materials), multiple cavities, or simple tooling. Place on hidden parting-line edges. Manual trim required.
Fan: Large flat panels (laptop lids, appliance fronts). Spreads flow evenly, reduces weld lines. Scar is long but can hide in texture or be post-finished.
Quick decision tree:
Visible Class-A surface? → Submarine (hide) or Valve (premium flush).
Need max flow for filled resins? → Edge/Tab.
Large flat part? → Fan.
Budget prototype? → Edge.
Zero waste high-volume luxury? → Valve hot runner.
Bottom line: Gate choice isn’t an afterthought. Decide it during CAD, before tooling quotes. Mark your preferred gate zone on the drawing (internal surface, away from cosmetics). Tell the mold maker: “Submarine preferred, hidden location only.” They’ll thank you, and your parts won’t look like they came from a 1990s toy bin.
Next: The DFM report—your last chance to fix sins before cutting steel.

7. The DFM Report – Read It or Cry Later
The DFM report (Design for Manufacturability) is the mold maker's polite way of saying: “Your CAD is cute, but here’s why it will cost you extra money, time, and sanity if we don’t fix these issues before cutting steel.”
Good shops (ProtoLabs-style automated ones, FirstMold, Boyan, or any serious Chinese Tier-1) send you this report free with the quote or shortly after. It’s usually a PDF packed with annotated screenshots of your part, color-coded highlights, thickness maps, flow simulations (sometimes), and a laundry list of recommendations. Ignore it, and you’ll pay dearly during trials. Read it, respond thoughtfully, and you can shave 10–40 % off tooling costs while getting better parts faster.
A solid DFM report from 2026 typically includes these sections (based on real examples from FirstMold, Boyan, Protolabs, and others):
General info overview — Part name, CAD revision, material suggested, expected volume, mold type (single/multi-cavity, aluminum/steel), basic specs.
Parting line proposal — Where the two halves split. Red flags if it crosses cosmetics or creates ugly flash lines.
Gate location & type suggestions — Multiple options shown with pros/cons (e.g., “Submarine gate on bottom rib recommended to hide vestige; hot tip on top would leave visible mark”).
Wall thickness analysis — Color-coded 3D map: green = good (2–3 mm), yellow = marginal, red = too thick/thin → sink/warp risk. They’ll circle problem zones.
Draft angle check — Highlights zero or insufficient draft on walls, ribs, bosses.
Undercut detection — Lists every slide/lifter needed, with added cost estimates.
Rib & boss review — Flags thick ribs (>60 % wall), standalone bosses, lack of gussets.
Radii & sharp corners — Points out stress risers that will crack parts or mold inserts.
Ejector pin placement — Suggests safe zones (non-cosmetic) and warns about witness marks on visible areas.
Flow & weld line prediction — Basic Moldflow-style lines showing potential knit lines, air traps, short shots.
Cooling & warp simulation notes — If run, shows predicted shrinkage/warpage; often recommends design tweaks.
Cost impact summary — “Adding 2° draft: no extra cost. Adding 4 slides: +$18k.”
Action items — Numbered list: “Please modify wall at section A-A to uniform 2.5 mm” with before/after screenshots.
7.1 Real Annotated DFM (with Color Coding) from ProtoLabs / FirstMold
Imagine opening a PDF and seeing your part exploded in 3D views:
Red zones on a thickness map where walls jump from 1.2 mm to 5 mm → “Severe sink mark risk; recommend coring or uniformizing.”
Yellow arrows pointing to zero-draft vertical walls → “Ejection failure likely; add 1.5–3° draft.”
Blue circles around proposed gate locations → “Edge gate here would leave visible scar; suggest tunnel gate on internal boss.”
Green checkmarks on ribs that pass the 60 % thickness rule.
Red warning icons next to undercuts → “Requires 2 hydraulic slides; estimated +$12,000 tooling.”
Protolabs often auto-generates these during quoting with interactive highlights (clickable advisories in their portal). Chinese shops like FirstMold provide detailed PDF versions with hand-annotated screenshots and Moldflow excerpts.
7.2 The 10 Lines Junior Designers Always Ignore (and Regret)
Here are the ones that bite hardest:
“Wall thickness variation exceeds 25 %” — Ignored → sink marks on every part.
“Insufficient draft on core side” — Ignored → stuck parts, scraped texture, EDM rework ($10k+).
“Proposed gate on cosmetic surface” — Ignored → visible scars, customer returns.
“Undercut detected – slide required” — Ignored → surprise $15k add-on at T1.
“Rib thickness 85 % of wall” — Ignored → read-through sink on show surface.
“Sharp internal corner (R=0)” — Ignored → brittle failure in drop test.
“Parting line crosses Class-A area” — Ignored → ugly flash seam forever.
“Ejector pins needed on visible face” — Ignored → dimple marks that ruin premium feel.
“Weld lines expected near logo” — Ignored → weak spots or visible lines.
“Cooling simulation shows >0.5 mm warp” — Ignored → banana-shaped assemblies.
Pro tip: Reply to the DFM point-by-point. Say “Accepted” or “Rejected – reason + alternative.” Good factories iterate with you (1–3 rounds free). Bad ones ghost.
The DFM is your final safety net before steel flies. Treat it like gospel, fix the reds/yellows, and you’ll sail through T1 trials. Skip it, and you’ll be the founder refreshing WeChat at 3 a.m. wondering why nothing ejects.
Next: The prototyping ladder—because jumping straight to a $40k mold is how legends become cautionary tales.
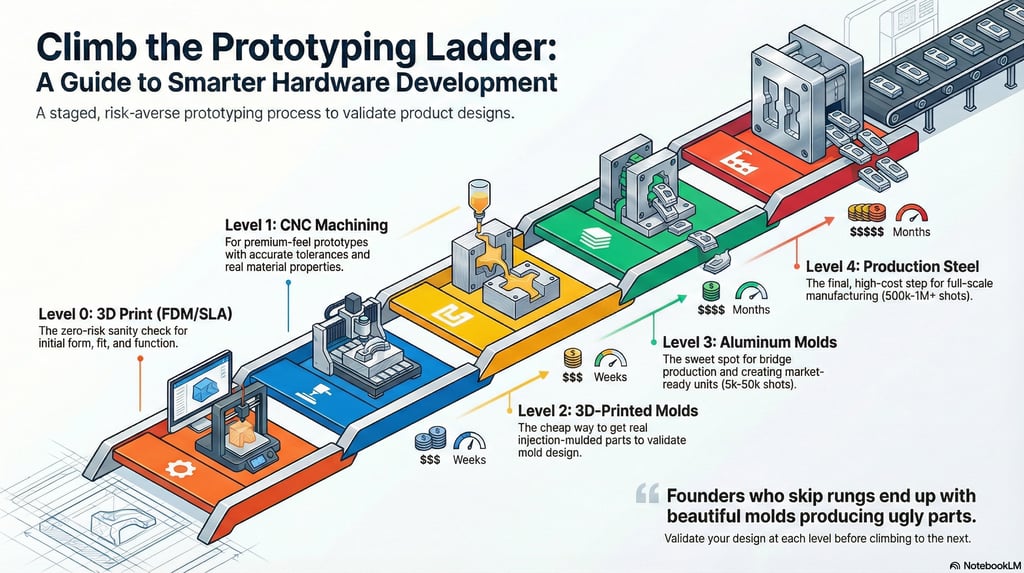
8. The Prototyping Ladder – Never Jump Straight to Steel
Jumping from a pretty CAD render straight to a $40k–$100k+ production steel mold is how hardware startups become cautionary tales on Reddit and Kickstarter update threads. You will find issues: sink marks you didn’t see, warp you didn’t predict, gate scars that ruin cosmetics, fit problems in assemblies, or drop-test failures. Fixing those after steel is cut costs 5–10× more than catching them early.
The smart path is a prototyping ladder: start cheap/fast/low-risk, climb as confidence grows. Each rung validates more (function, cosmetics, material behavior) while keeping sunk costs low. Here’s the real 2026 ladder used by pros (updated from Protolabs, Xometry, Fictiv, Formlabs, and Chinese shops like Jino/FirstMold data).
8.1 Level 0 – 3D Print (FDM/SLA/MJF) – The Zero-Risk Sanity Check
Cost: $20–$500 per part (depending on size/material; $100–$300 typical for phone-case sized).
Lead time: 1–5 days (in-house or service like Xometry/Protolabs).
Shot life / volume: Unlimited iterations, but parts are printed, not molded.
Use case: First form/fit/function check, quick iterations on draft/ribs/walls. Test snap-fits, tolerances, assembly.
Reality check: Looks rough (layer lines), mechanicals different (anisotropic strength), no real plastic flow simulation. Great for 1–50 pieces.
Start here. Fix obvious sins before spending real money.
8.2 Level 1 – CNC Machined from Solid Block
Cost: $200–$2,000 per part (complex geometry pushes higher).
Lead time: 5–15 days.
Volume: 1–20 pieces usually.
Use case: Better surface finish than 3D print, real material (mill from ABS/PC/PP blocks), accurate tolerances, drop/impact testing.
Downside: No undercuts without multi-setup, expensive for volume, no true molded properties (grain direction).
Good bridge if you need 5–10 functional prototypes that feel premium.
8.3 Level 2 – 3D-Printed or Soft Mold Inserts (Hybrid Rapid Tooling)
Cost: Tooling $500–$5,000 (SLA/DLP high-temp resin inserts in aluminum frame); parts $5–$50 each.
Lead time: 3–10 days for mold + parts.
Shot life: 10–1,000 shots (Formlabs Rigid 10K or similar resins; 50–200 typical before degradation).
Use case: True injection-molded parts in real resin (ABS-like, PP-like), test flow, sink, warp, gate marks. Iterate mold design cheaply.
Reality in 2026: Viable for small/simple parts (up to ~164 cm³ volume). Inserts in aluminum frames prevent deflection. Best for low-pressure/low-heat resins. Not for glass-filled or high-temp materials.
Huge win for validating DFM sins without big steel commitment. Many startups stop here for crowdfunding samples.
8.4 Level 3 – Aluminum Prototype Mold (5k–50k Shots)
Cost: $3,000–$20,000 (single-cavity simple: $3k–$10k China; $8k–$25k domestic/Protolabs). Multi-cavity adds up.
Lead time: 1–4 weeks (7–18 days fast-turn China 2026).
Shot life: 5,000–100,000 cycles (soft aluminum ~10k–50k; pre-hardened better).
Use case: Bridge production (100–10,000+ parts), real molded properties, full material testing, assembly validation, pre-sales stock.
Pro: Parts indistinguishable from production (same process, finish options). Cheaper/faster than steel.
This is the sweet spot for most Kickstarter/market-entry. Protolabs guarantees 2,000+ shots; Chinese shops push 10k–50k with care.
8.5 Level 4 – Production Steel (P20/H13, 100k–1M+ Shots)
Cost: $25,000–$200,000+ (multi-cavity, slides, hot runner).
Lead time: 8–16+ weeks.
Shot life: 500k–millions.
Use case: Full-scale ramp-up, high-volume, abrasive resins.
Only cut steel after aluminum (or 3D-printed insert) trials confirm the design is golden.
Quick Cost vs Time vs Risk Chart (2026 China Tier-1 averages):
Level 0 (3D print): $ low, time days, risk minimal → Iteration heaven.
Level 1 (CNC): $$ medium, time 1–2 weeks, risk low.
Level 2 (3D mold insert): $$–$$$ , time 1–2 weeks, risk medium (limited shots).
Level 3 (Aluminum): $$$–$$$$ , time 2–4 weeks, risk low-medium → Best bridge.
Level 4 (Steel): $$$$$ , time 2–4 months, risk high if unvalidated.
Bottom line: Climb the ladder. Spend $500 on 3D-printed inserts and find the warp issue now, or spend $80k on steel rework later. Founders who skip rungs end up with beautiful molds producing ugly parts. Don’t be that founder.
Next: War stories from the trenches—because nothing teaches like watching someone else lose six figures.
9. War Stories From the Trenches
These aren't hypotheticals. They're anonymized (mostly) real failures I've witnessed, heard from tooling engineers, or pieced together from public postmortem threads, Kickstarter updates, and supplier horror stories. Each one cost someone six figures—or their company—and every single one traces back to ignoring one or more of the 7 rules, bad material choice, skipping prototyping steps, or pretending the DFM report was optional reading. The one-line lessons at the end of each are the tattoo-worthy part.
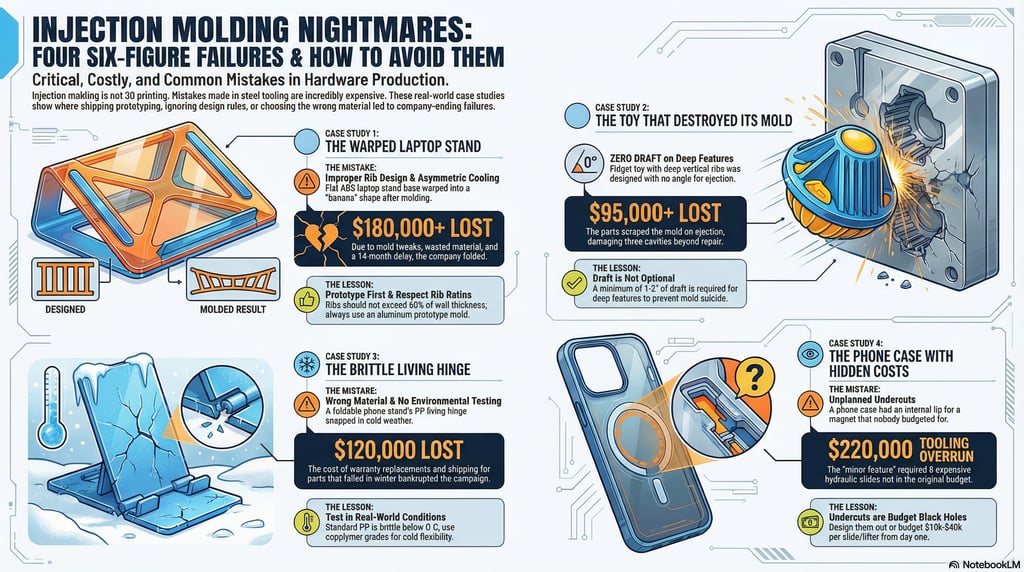
9.1 The $180k Laptop Stand That Warped into a Banana
A hardware startup raised $450k on Kickstarter for a "minimalist adjustable laptop stand" made from matte black ABS. The render showed clean lines, uniform 2.5 mm walls, and slim ribs for stiffness. They sent the CAD straight to a Shenzhen shop for a 16-cavity P20 steel mold without running an aluminum prototype or even a basic Moldflow.
First shots came back looking perfect in photos... until assembly. The long flat base warped 8–12 mm into a gentle banana curve. Why? Ribs were 90 % of wall thickness (violation of Rule 3), and the base had slight asymmetry in cooling channels that amplified non-uniform shrink (Rule 1 broken too). The founder ignored the DFM warning: "High warp risk due to rib thickness and asymmetric geometry—recommend redesign or gas-assist."
Fix attempts: added more ribs (worse sink), tried stiffer PC/ABS (different shrink rate → new warp), even post-annealing. Nothing worked. Mold tweaks cost $65k, material swaps another $40k in wasted resin and rework. Campaign delayed 14 months, refunds demanded, company folded. Backers got a PDF apology.
One-line lesson: Ribs thicker than 60 % of wall + asymmetric cooling = warp. Prototype in aluminum first or watch your flat part become modern art.
9.2 The Children’s Toy with Zero Draft That Destroyed Three Cavities in 200 Shots
A toy company launched a soft-touch PP fidget spinner with deep internal ribs for grip. Renders were adorable—bright colors, smooth curves. They went straight to production steel (H13, 8-cavity) because "volume will be high after launch." No draft on the vertical ribs (Rule 2 ignored entirely). Mold maker flagged it in DFM: "Zero draft on 35 mm deep features—ejection will scrape texture and damage core."
They pushed ahead anyway, thinking "Chinese factories can handle it with mold release." First 200 shots: parts ejected with force, scraping the textured surface off the cavities. By shot 250, three cores had galling and scratches deep enough to show on every part. Texture EDM rework: $28k per cavity. Total mold damage bill: $95k + lost production time. Toy never shipped in promised colors; company pivoted to simpler silicone versions and ghosted backers.
One-line lesson: Zero draft on deep features isn't "optimistic"—it's mold suicide. Minimum 1–2° or pay for EDM heaven.
9.3 The “Genius” Living Hinge That Turned Brittle at −5 °C
An outdoor gadget startup crowdfunded a foldable phone stand with a PP living hinge. They tested prototypes in room temp (great flex), ignored cold-weather testing. Chose standard PP (not copolymer grade for low-temp ductility). Mold ran fine—submarine gates hidden, uniform walls—but first winter shipments to backers in Canada/Europe: hinges snapped after a few folds in freezing temps.
Root cause: Standard PP becomes brittle below 0 °C; living hinges need impact-modified or copolymer PP for cold flexibility. They hadn't changed material post-prototype (where they used warmer-climate testing). Returns flooded in; warranty replacements cost $120k in parts/shipping. Campaign died quietly; founders blamed "supply chain issues."
One-line lesson: Living hinges demand the right PP grade (copolymer or impact-modified) and real environmental testing. "It works in the office" ≠ "it works in a Minnesota garage at −10 °C."
9.4 Bonus Short One: The $220k Phone Case with Hidden Undercut Apocalypse
A "ultra-slim magnetic phone case" had an internal lip for magnet retention—an undercut nobody planned for. CAD showed clean parting line; DFM screamed "multiple slides required." Founder: "We can hand-load inserts." Reality: 32-cavity mold needed 8 hydraulic slides (not budgeted). Surprise add-on: $85k. Then slides stuck during trials because draft was marginal. Rework + delays: another $135k. Total tooling overrun: $220k. Never shipped.
One-line lesson: Undercuts aren't "minor features"—they're budget black holes. Redesign or budget $10k–$40k per slide/lifter from day one.
These stories repeat because founders treat injection molding like 3D printing: iterate fast, fix later. But steel doesn't iterate cheaply. The pattern? Skipping the ladder (aluminum prototypes), ignoring DFM reds, violating the 7 rules, picking wrong material without testing extremes, or assuming factories will "figure it out."
Learn from the corpses: Climb the prototyping ladder religiously. Treat every DFM line as gospel. Tattoo the 7 rules. Test in real conditions. And if a supplier says "no problem" to a clear violation—run.
You've now got the knowledge to avoid becoming one of these stories. Last chapter: your checklist to make sure you never do.
10. Your New Religion: The Ultimate Pre-Release Checklist
You’ve read the war stories. You’ve seen how one overlooked rib or forgotten draft angle turns a promising product into a six-figure paperweight. The only way to break the cycle is ritual: never send CAD to a factory without running this checklist first.
Print it. Laminate it. Pin it above your monitor. Make every team member (designer, engineer, PM) sign off on every yes/no before you hit “export.” This 25-question gate has saved dozens of projects I’ve consulted on from disaster. Treat it like a pre-flight checklist—skip a step and you might not come back.
Ultimate Injection Molding Pre-Release Checklist
Are all walls uniform thickness (±25 % max variation)? Nominal 1.8–3.0 mm?
Minimum draft 1° on all vertical walls? 2–3° if textured?
Ribs ≤60 % of nominal wall thickness? Height ≤3× wall?
All ribs/bosses drafted and connected to walls/ribs? Gussets added?
No standalone thick bosses? Cored or ribbed?
All internal corners ≥0.5× wall radius? External ≥1.5× wall?
Undercuts eliminated or deliberately budgeted (slides/lifters quantified)?
Parting line located away from Class-A cosmetics?
Gate location hidden (submarine/tunnel preferred)? No hot-tip on visible surfaces?
Ejector pin zones marked (non-cosmetic only)?
Material selected and locked (with shrink rate known)?
Resin tested for environment (cold/heat/chemical/UV/drop)?
DFM report received and all red/yellow issues resolved?
Wall thickness analysis run (no red zones >4 mm or <1.2 mm)?
Mold type decided (aluminum prototype first if volume <50k)?
Files complete: STEP + fully dimensioned PDF + critical notes?
RFQ sent with 15-question template to ≥3 shops?
Quotes compared (breakdown, not just total)? Red flags checked?
Prototyping ladder climbed (3D → CNC → insert → aluminum)?
Assembly fit checked with molded-like prototypes?
Drop/impact/vibration tested in target material?
Living hinge (if any) in correct PP grade and flex-tested cold?
Weld-line locations acceptable (not on logo/visible face)?
Expected mold life/volume matches tooling choice?
Team sign-off: Everyone agrees “no known violations of the 7 Rules”?
Download the Printable PDF: Ultimate Injection Molding Pre-Release Checklist
If every answer is “Yes” (or “No but justified with fix/cost”), send the files. If even one is “No” without a plan, stop. Fix it. You now have religion.
Closing – Stop Being the Statistic
You started this article because you’re scared of becoming another Kickstarter ghost story. Good. Fear is the best teacher in hardware.
The brutal truth: 90 % of projects fail at the mold stage not because factories are incompetent, but because designers treat injection molding like an afterthought. They chase renders, ignore physics, skip prototypes, and pray the Chinese will miracle it. They don’t. They quote what you give them, cut steel, and send the bill.
But you’re different now.
You know uniform walls are non-negotiable. You respect draft angles like they’re loaded guns. You hide gates like state secrets. You climb the prototyping ladder instead of BASE - jumping into production steel. You read every line of the DFM like it’s a prenup. And you run the checklist religiously.
Do that, and the statistic stops applying to you.
Your next product can ship on time, look like the render, feel premium, and actually make money instead of debt. The factories will respect you. The backers will thank you. And you’ll sleep without checking WeChat at 3 a.m. for bad news.
Bookmark this. Share it with every intern, co-founder, and industrial designer you know. Tattoo the 7 rules if you have to. Because the next million-dollar mistake isn’t inevitable—it’s optional.
You’ve been warned. Now go build something that doesn’t break.
SERVICES
Peakingtech © 2025. · Shenzhen, China · Privacy Policy · Terms of Service
Contact Form
Metal Parts
Peakingtech® is a registered trademark of Peakingtech Co in the United States.
COMPANY
CONTACT